Contributing to documentation
Contents
Contributing to documentation#
This document describes how to contribute to Plone Documentation.
Contributions to the Plone Documentation are welcome.
See also
To set up and build the documentation locally, see Building and checking the quality of documentation.
Granting permission to publish#
Before you contribute, you must give permission to publish your contribution according to the license we use. You may give that permission in two ways.
Sign the Plone Contributor Agreement. This method also covers contributions to Plone code. It is a one-time only process.
In every pull request or commit message, include the following statement.
I, [full name], agree to have this contribution published under Creative Commons 4.0 International License (CC BY 4.0), with attribution to the Plone Foundation.
The Plone Documentation is licensed under the Creative Commons Attribution 4.0 International License (CC BY 4.0). A copy of the license is included in the root of this repository.
Contributor roles#
Contributors to the Plone Documentation may perform one or many roles.
Plone users and developers use this documentation because it is accurate and actively maintained. People in these roles typically contribute minor corrections. They should read Building and checking the quality of documentation and MyST reference.
Authors create Plone Documentation. They should read Building and checking the quality of documentation and MyST reference. They should also read Authors guide for guidance and tips for writing good technical documentation.
Documentation quality requirements#
We use GitHub Actions with every pull request to enforce Plone Documentation quality. We recommend that you build the documentation locally to catch errors and warnings early on. See Building and checking the quality of documentation for instructions for how to set up and build the documentation and to run quality checks.
Making contributions on GitHub#
Contributions are managed through git repositories on GitHub.
In the Plone organization, it is strongly recommended that you read Granting permission to publish and take appropriate action.
After your Plone Contributor Agreement has been approved, and you have been added to the Plone GitHub organization as a member of the Developers team, we recommend that you follow our guidelines.
Discuss whether you should perform any work. Any method below is acceptable, but are listed in order of most likely to get a response.
Search for open issues in the issue trackers of documented projects, and comment on them. If an issue does not already exist for what you want to work on, then create a new issue in its issue tracker.
As a convenience, at the top right of every page, there is a GitHub navigation menu. Tap, click, or hover over the GitHub Octocat icon for options.

You can use this menu to quickly navigate to the
documentationsource repository or open an issue. Note that this navigation convenience is provided only for thedocumentationrepository.Discuss during sprints, conferences, trainings, and other Plone events.
Ask on the Plone Community Forum, Documentation topic.
Ask in the Plone chat on Discord.
For first-time contributors especially, you do not need to ask to be assigned to, or to work on, an open issue. As in any open source project, you can start work on open issues at your convenience.
Tip
Working on documentation or on issues labeled with either
33 needs: docsor41 lvl: easyare the two best ways for first-timers to contribute. This is because first-timers have a fresh perspective that might be overlooked by old-timers.Clarify the scope of work that needs to be done. Check for previous work, assignment to another developer, or whether the requirements have changed.
Assign yourself to the issue. This signals to other developers that you are working on the issue.
From here, you can either make Quick edits or Large edits.
Quick edits#
Quick edits for minor issues, such as typographical errors, misspellings, and English grammar and syntax, can be made through the GitHub user interface.
Navigate to the repository as noted in Making contributions on GitHub.
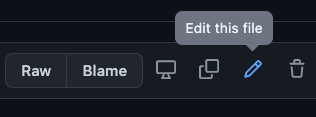
Navigate with the
docsdirectory to find the source file to edit.Click the pencil icon to edit the file in the browser.
Make edits, add a commit message, select Create a new branch for this commit and start a pull request, then click Propose changes.
Make your pull request against the branch
6.0.Members who subscribe to the repository will receive a notification and review your request.
Request a review from other team members.
Large edits#
For large edits, first follow the instructions in Building and checking the quality of documentation.
Once you have your environment set up, then you can follow the standard practice for making a pull request.
This practice differs depending on whether you are making contributions to only the core documentation files, or plone.api, plone.restapi and volto files as well.
Working with only the plone/documentation repository#
This section describes how to make contributions to files in the plone/documentation repository only, and excludes files in submodules/plone.api/docs, submodules/plone.restapi/docs and submodules/volto/docs.
From the project root directory, sync your local
6.0branch with its remote. You might need to resolve conflicts.git checkout 6.0 git pull
Create a new branch from
6.0.git switch -c <new_branch>
Edit files, save, preview, and test. You must run and pass the builds
htmlandlinkcheckwithout causing new errors.# Optionally clean the builds to avoid cache issues make clean make html make linkcheck
Note
Currently there are some errors on the
htmlbuild, mostly due to emptymetaHTML tags. You are welcome to fix as many errors as you like. You are only responsible to fix errors that you create.Note
Eventually the
valebuild will be required, but not at this time. We welcome improvements to the dictionary.See also
After the builds pass, commit changes to your branch, and push it to the remote repository on GitHub. The remote repository may be either a branch in your fork of the project or a branch in the
plone/documentationupstream repository.git commit -m "My descriptive commit message" git push
Visit the GitHub
documentationrepository, and create a pull request against the branch6.0.Members who subscribe to the repository will receive a notification and review your request.
Request a review from other team members.
Editing external package documentation#
If you want to edit documentation of imported external packages, the process is slightly different.
We use git submodules to manage multiple repositories.
We imported the external repositories the plone/documentation repository as described in Building and checking the quality of documentation.
Important
We currently use the branches plone/documentation@6.0, plone/plone.api@master, plone/plone.restapi@main, and plone/volto@main as the main branches for developing Plone 6 Documentation.
From the project root directory, sync your local
6.0branch with its remote. You might need to resolve conflicts.git checkout 6.0 git pull
Change your working directory to the imported package's directory under
submodules/.# Choose one. cd submodules/plone.api cd submodules/plone.restapi cd submodules/volto
Update the submodule, and sync your local development branch with its remote. You might need to resolve conflicts.
git submodule update

# for plone.api
git checkout master

# for plone.restapi or volto
git checkout main

git pull
Create a new branch from the development branch.
git switch -c <new_branch>
Make edits to files in
docs/<external_package>using your favorite editor, and save, preview, and test. You must run and pass the buildshtmlandlinkcheckwithout causing new errors.# Optionally clean the builds to avoid cache issues. # Note that for the external packages' documentation only, # we use "docs-" as a prefix for make targets to avoid a conflicts. make docs-clean make docs-html make docs-linkcheck
Back in
submodules/<external_package>, commit and push your changes to the remote.git add <files> git commit -m "My commit message" git push
Now return to the project root directory, and update the submodule to point to the commit you just made, and push your changes to the remote repository.
cd ../..

# for plone.api
git add submodules/plone.api
git commit -m "Update submodules/plone.api tip"

# for plone.restapi
git add submodules/plone.restapi
git commit -m "Update submodules/plone.restapi tip"

# for Volto
git add submodules/volto
git commit -m "Update submodules/volto tip"

git push
Visit the GitHub
plone/<external_package>repository, and create a pull request against the development branch.Members who subscribe to the
plone/<external_package>repository will receive a notification and review your request.Request a review from other team members.